
In This Article
Google Analytics 4, commonly known as GA4, represents the next evolution of Google’s web analytics offerings. Unlike its predecessor, Universal Analytics (UA), GA4 offers a more user-centric model and has several features that offer deeper insights into user behavior. However, the new platform also comes with its own learning curve. One of the tasks that continues to be non-trivial is identifying 404 errors as there is not out of the box GA4 404 report. In this post we will cover how to find 404 errors in GA4.
What are 404 errors?
Before diving into the steps, it’s important to understand what 404 errors are. Simply put, a 404 error occurs when a visitor tries to access a page on your website that doesn’t exist. This can be due to various reasons, such as deleted pages, changed URLs, or incorrect links. Monitoring 404 errors is essential because they can negatively impact user experience and SEO.
While the term “404 error” is often used broadly to describe any instance where a requested page can’t be found, it’s crucial to understand that there are two primary types of 404 errors: hard 404s and soft 404s. These two errors might appear similar to the average user, but they have distinct characteristics and implications, especially from an SEO perspective.
The first thing you need to do is understand how your website functions when a 404 is encountered, especially as it pertains to hard vs. soft 404 errors. The behavior or your website will dictate how you track and find 404 errors in GA4.
Hard 404 Errors
A hard 404 error occurs when a server responds with an HTTP 404 status code, indicating that the requested URL doesn’t exist on the server. This is the standard response for a genuine “Page Not Found” scenario.
A user will typically see an error page, often with a message like “Page Not Found” or “The requested URL was not found on this server.”
Soft 404 Errors
A soft 404 error arises when a non-existent page (a page that should return a 404 status) provides a different status code, usually a 200 OK. This means the server is telling search engines that the page exists, even though the content might suggest otherwise.
Just like with hard 404s, users might see a “Page Not Found” message. However, because the server isn’t giving a 404 status, some other functions (like redirects) might not work as intended.
Determine the 404 Behavior of a Website
The reason this is important is that typically a hard 404 error will have a page title that indicates the visitors has experienced a 404 error. A soft 404 error may not have a page title indicating the visitor has experienced a 404 error. To determine the behavior of your website, force a 404 error and then check the status code and page title to see how the site behaves.
Two Methods for Finding 404 Errors in GA4
There are two methods for finding 404 errors in GA4. Understanding the difference between hard and soft errors is important as is understanding the behavior of your website when a 404 is encountered.
Using Page Title is by far the easiest method if your site is setup properly to use this approach. With this method you likely have historical data that allows you to see 404 errors over time.
Using Events to find 404 errors in GA4 is a much more involved process that requires having events sent from your site to GA4 when a 404 error is triggered. Unless these events were setup in the past, upon setting this up you will see data starting from the point where these events began being sent. So you may not get to see historical data using this approach.
Using Page Title to Find 404 Errors in GA4
If your website returns hard 404 errors, then it’s quite possible that this technique will work to find 404 errors in GA4. In this case, your website likely uses a standard template for all 404 errors that has a unique page title indicating that the page is related to 404 errors.
This process uses native GA4 reporting. It doesn’t matter how the data gets there from your website, be it direct integration to GA4 or through a tool like Google Tag Manager (GTM).
Steps to Find 404 Errors in GA4 Using Page Title
Here are steps to follow to find 404 errors in GA4 using the page title to drive your own 404 report.
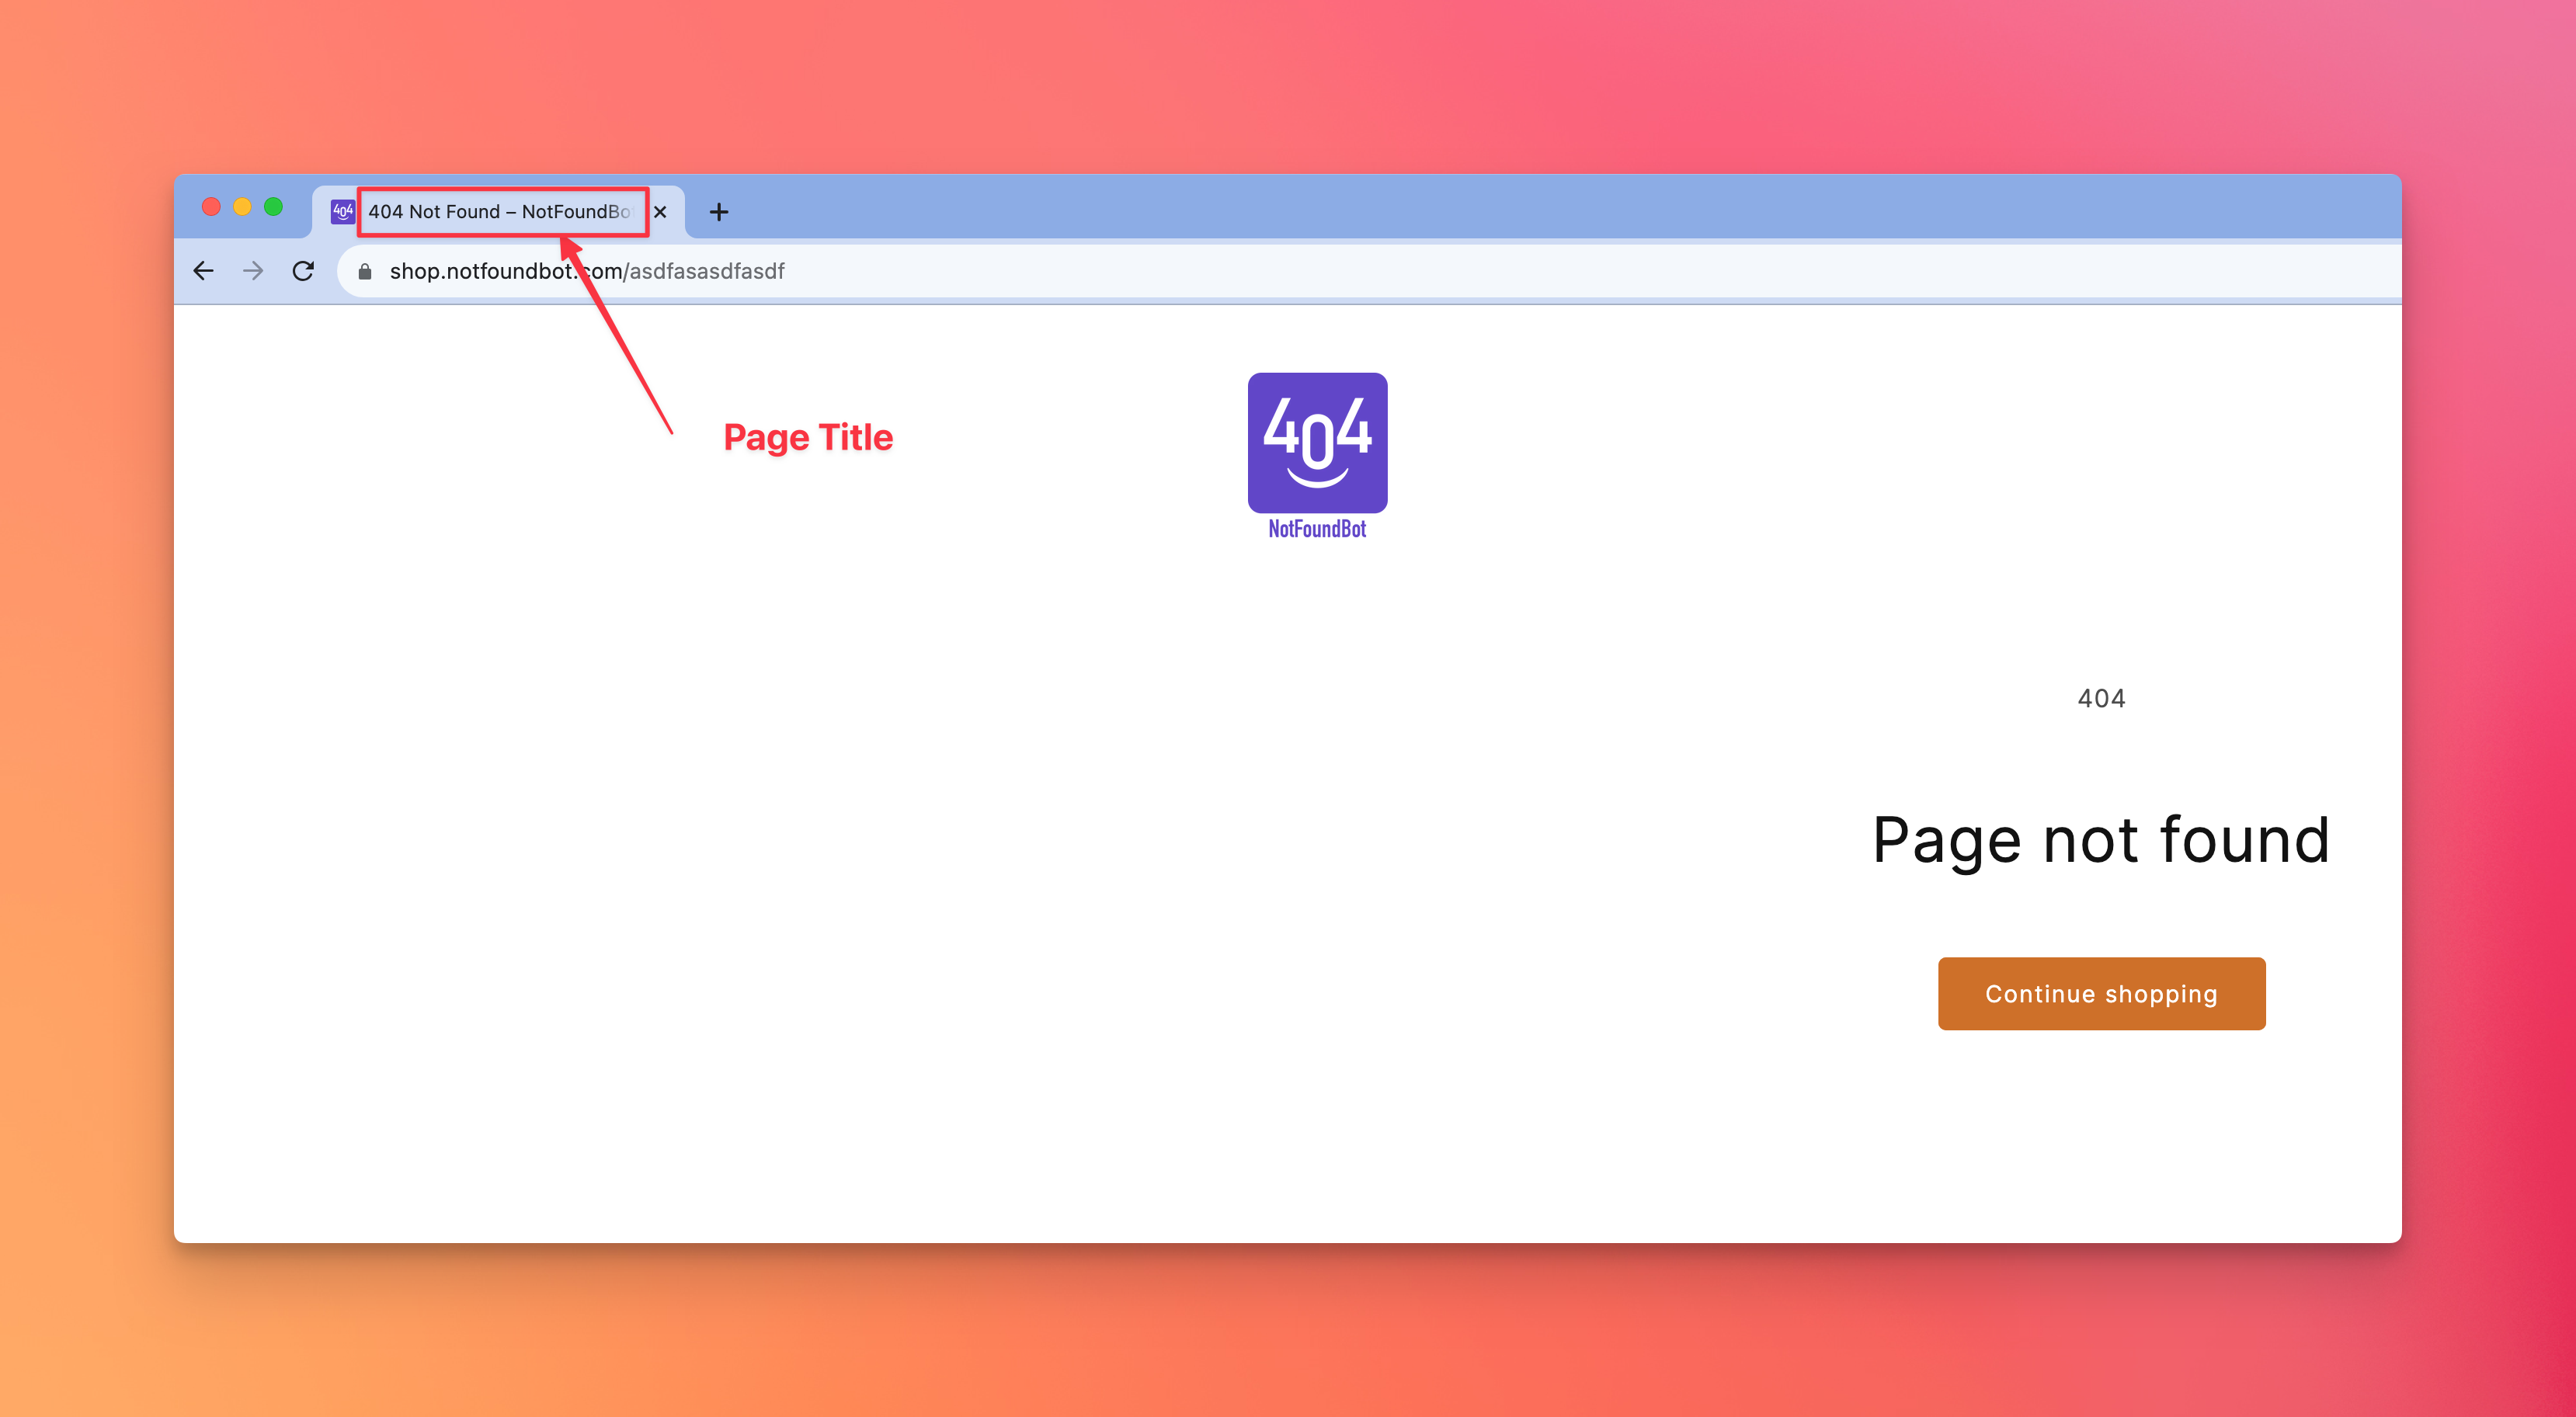
Step 1. Force a 404 Error
Go to your website and force a 404 error.
Step 2. Capture Page Title
Capture the page title that is displayed on the 404 page. For this technique to work, the title will need to be something unique and indicative of the error such as “404 not found” or “content not found”, etc.
If the page title isn’t unique with an indicative error notice, you need to have a developer alter the page title on your 404 template page. From that point forward you would then be able to follow these steps.
Step 3. Open GA4 for the Account
There isn’t a default 404 report in GA4. Open up Google Analytics and find the report that we want to alter to get the data. Open GA4 and select the appropriate “Account” for your store.
Step 4. Open Pages and screens Report
Select Reports > Engagement > Pages and screens.
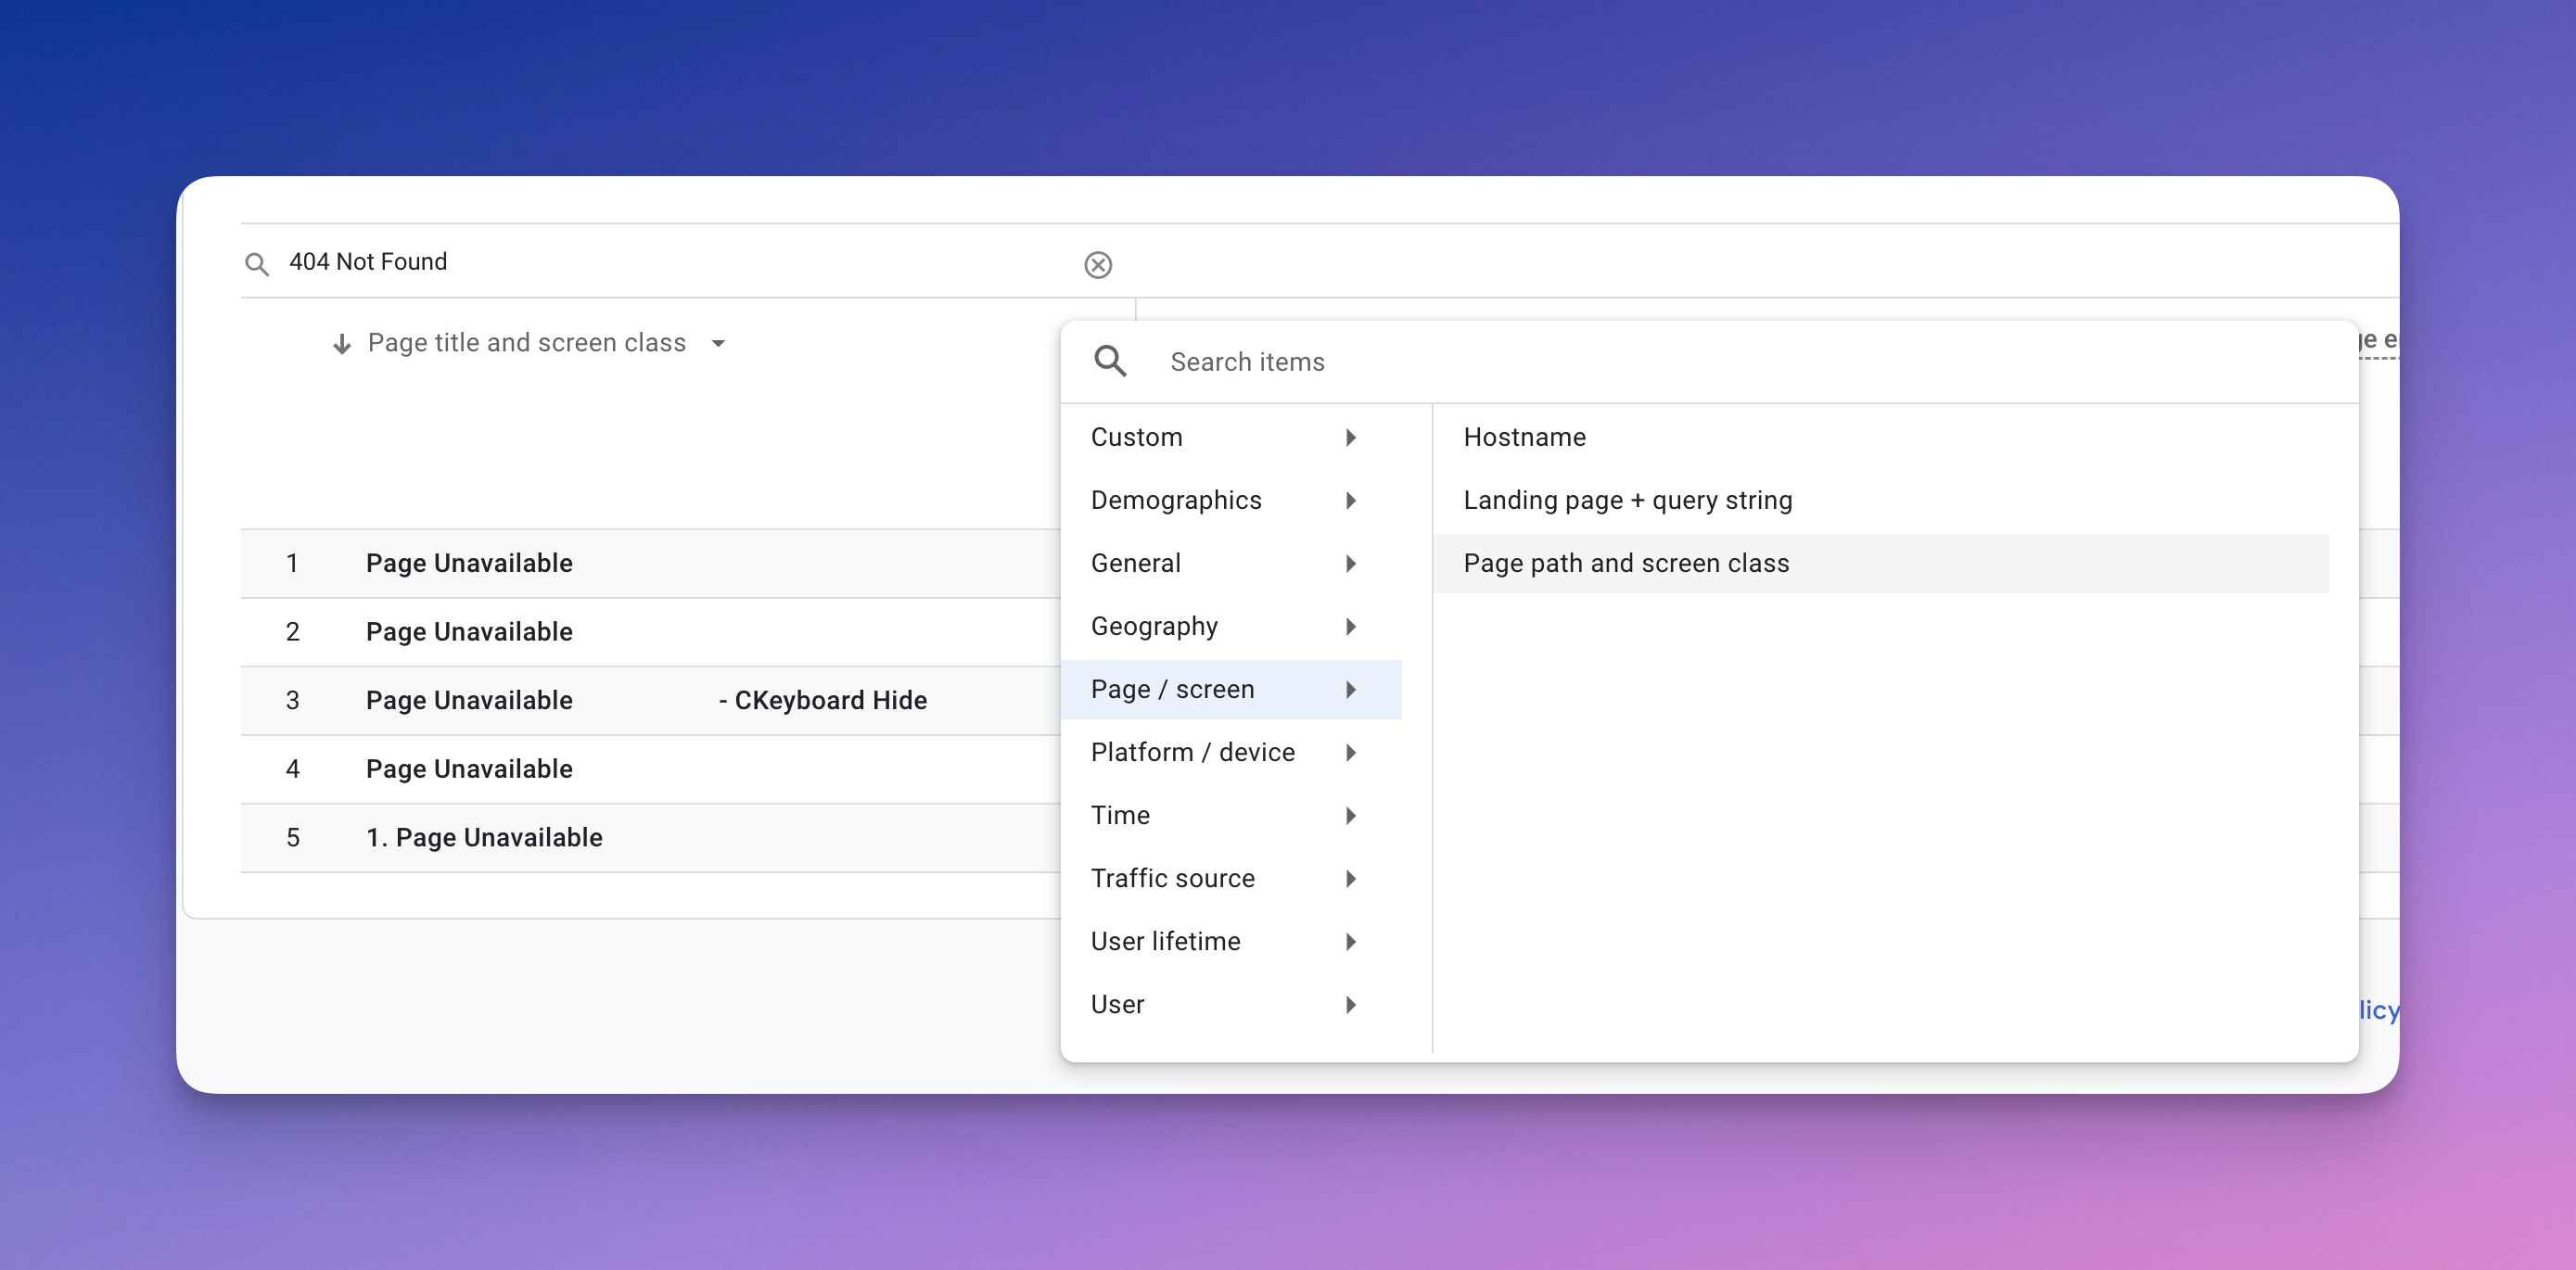
Step 5. Add Filter Value of 404 Page Title
Enter the 404 Page Title (collected in Step 2) in the search box, in the case of my example “404 Not Found” will do.
Step 6. Add Filter for Page title and screen class
Alter the dropdown below the search box to search based on “Page title and screen class”.

The report should now display the number of 404 errors that were viewed and received by your website visitors over the report time frame.
Step 7. Add Secondary Filter for Page path and screen class
In order to see which URL’s are getting 404 errors, you need to click on the + button to the right of Page title and screen class. This will cause a modal to popup where you will first select Page / screen and then select Page path and screen class. You should now be able to see how many 404 errors you are getting by URL.
Using Events to Find 404 Errors in GA4 via GTM
If page titles isn’t an option for finding 404 errors in GA4 for you, your next option is to add events to your website that send when a 404 is encountered, which includes cases where perhaps a soft 404 is being encountered. This approach may require having a developer that can assist in ensuring things are setup properly on your site in order to send and find 404 errors in GA4.
This approach assumes that you already have GA4 implemented on your website via Google Tag Manager (GTM).
We are going to be dealing with Tags, Triggers and the Data Layer in GTM. Here is the relationship between the three components as defined by Google.
Components of Google Tag Manager
- Tag: A tag is code that send data to a system such as Google Analytics.
- Trigger: A trigger listens for certain events, such as clicks, form submissions, or page loads. When an event is detected that matches the trigger definition, any tags that reference that trigger will fire.
- Data layer: Tag manager implements a data layer to temporarily hold values in the client so that they can be used by tags, triggers, and variables.
Steps to Setup and Find 404 Errors in GA4 Using Custom Events
Step 1. Push Events to the GTM Data Layer
When a visitor encounters a 404 error page, we want to push a custom event to Google Tag Manager’s Data Layer. You may need a developer to assist you with doing this as you need to be certain that the code to send the event is in the right place(s). The code to do this will look something like this:
window.dataLayer = window.dataLayer || [];
window.dataLayer.push({
  'event' : '404 not found'
});
You can alter the event if you wish, it could be “404” or “page not found” or “404 page not found”, whatever you desire. Take note of this value as you will use it in a few places in the following steps.
Once this is completed and the code change has been deployed, you can now go to step 2 to verify that you are seeing the event being pushed to GTM.
Step 2. Check that your Event is Being Pushed
We now need to ensure that the event is being pushed properly. To do this, open Tag Manager and select the appropriate container. You will now select “Preview” where you should first enter the URL that you know will create a 404 error. Something like https://[your_domain]/gibberish.
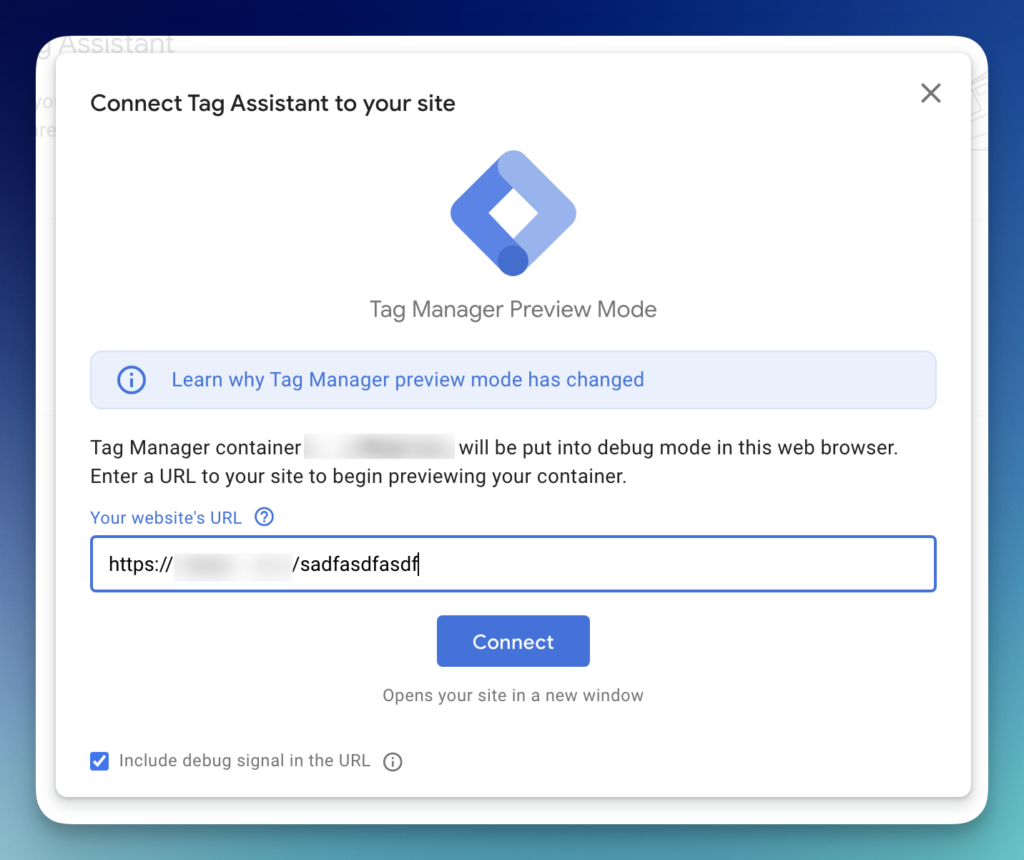
This opens up a new window to the URL that you entered. Don’t close this window, but you can minimize it and return to the Tag Assistant window.
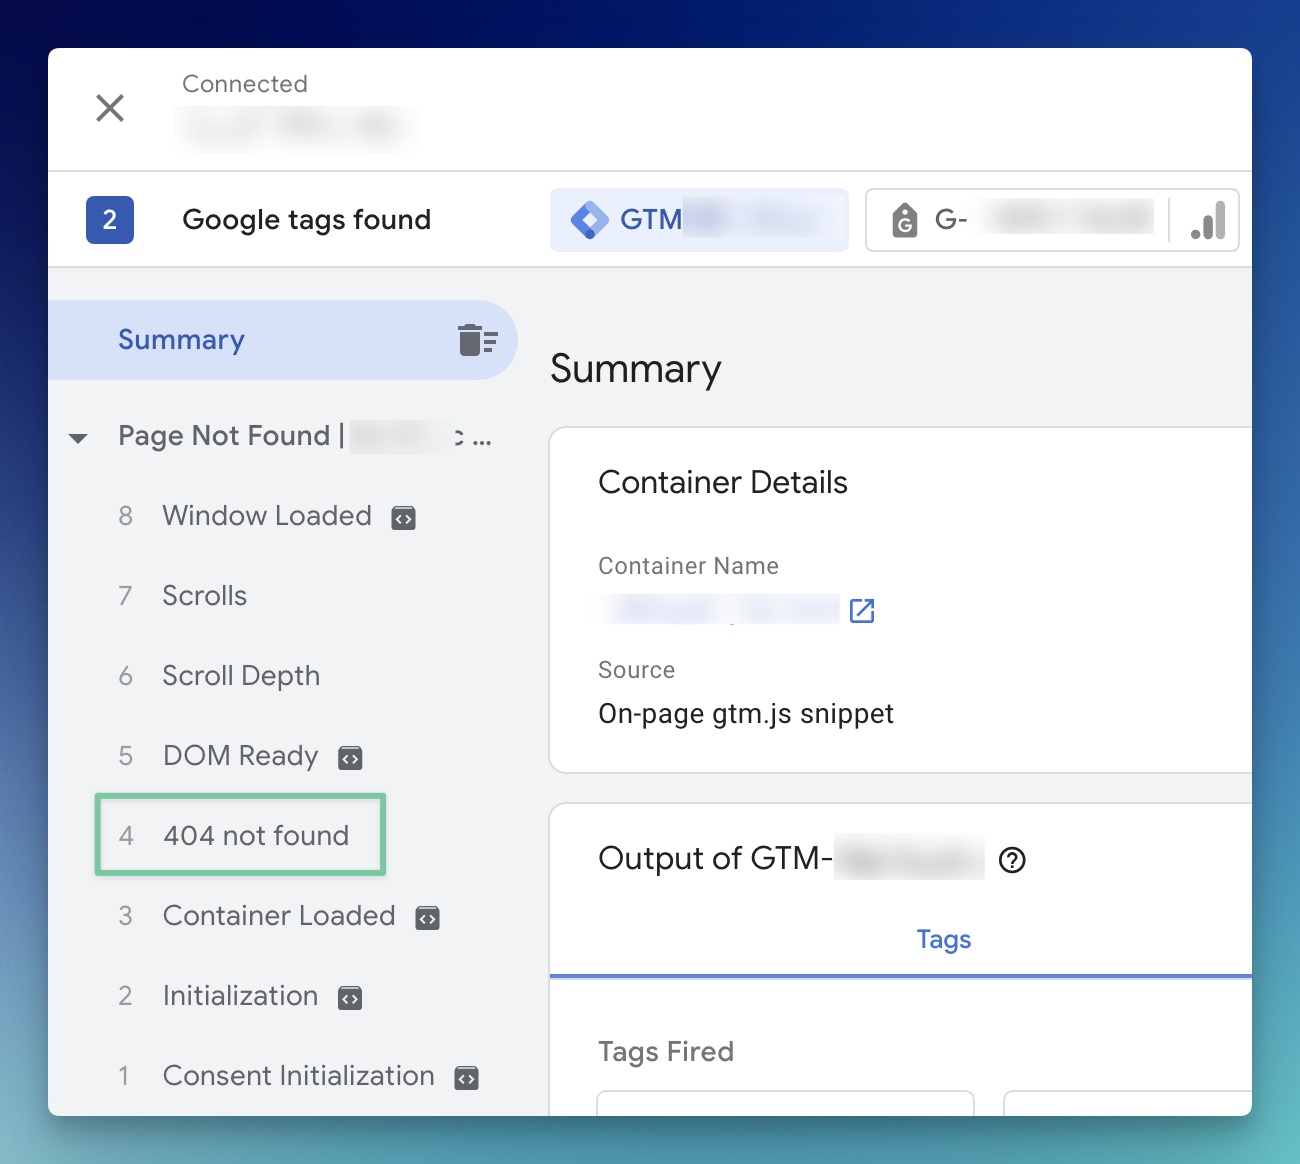
In the Tag Assistant window you will likely see one of the three most common scenarios.
- Properly Setup: If things are setup properly and the event is pushing properly you should see your event name in the Summary section. If this is the case you are good to move on to Step 3.
- GTM Setup but Custom Event not Pushed: If you see events in the Summary section of the Tag Assistant window, but you do NOT see your event “404 not found” then GTM is likely setup properly but for some reason the event isn’t being pushed. Ensure that you are on a url that 404’s and try again, first clearing your browser cache. If you continue to not see your event, you may need a developer to ensure that the event push code was implemented properly in Step 1.
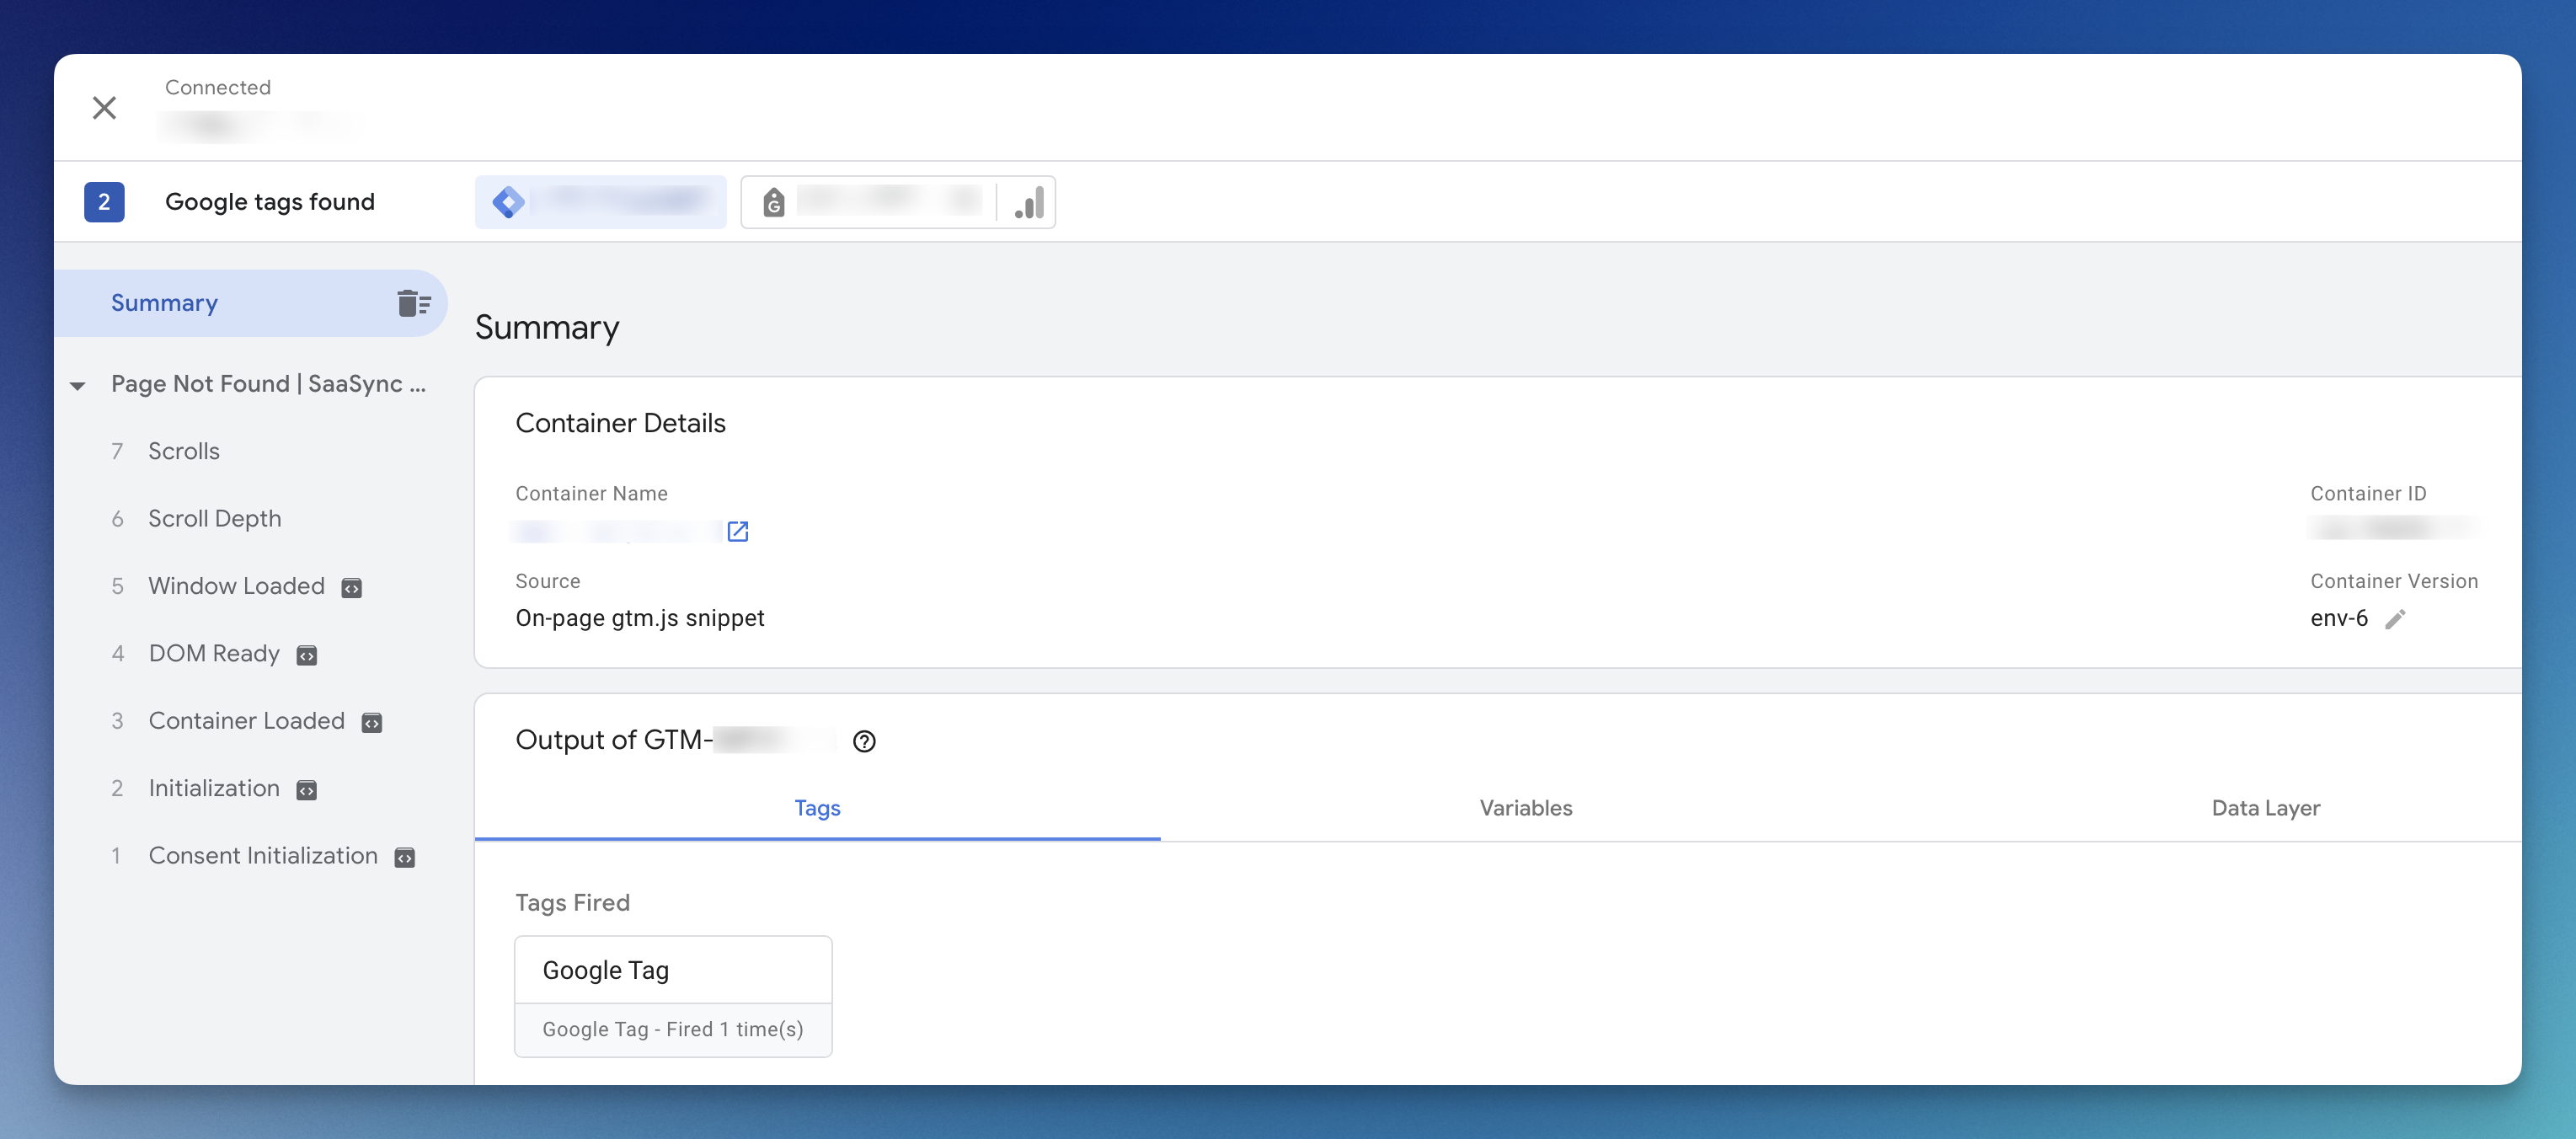
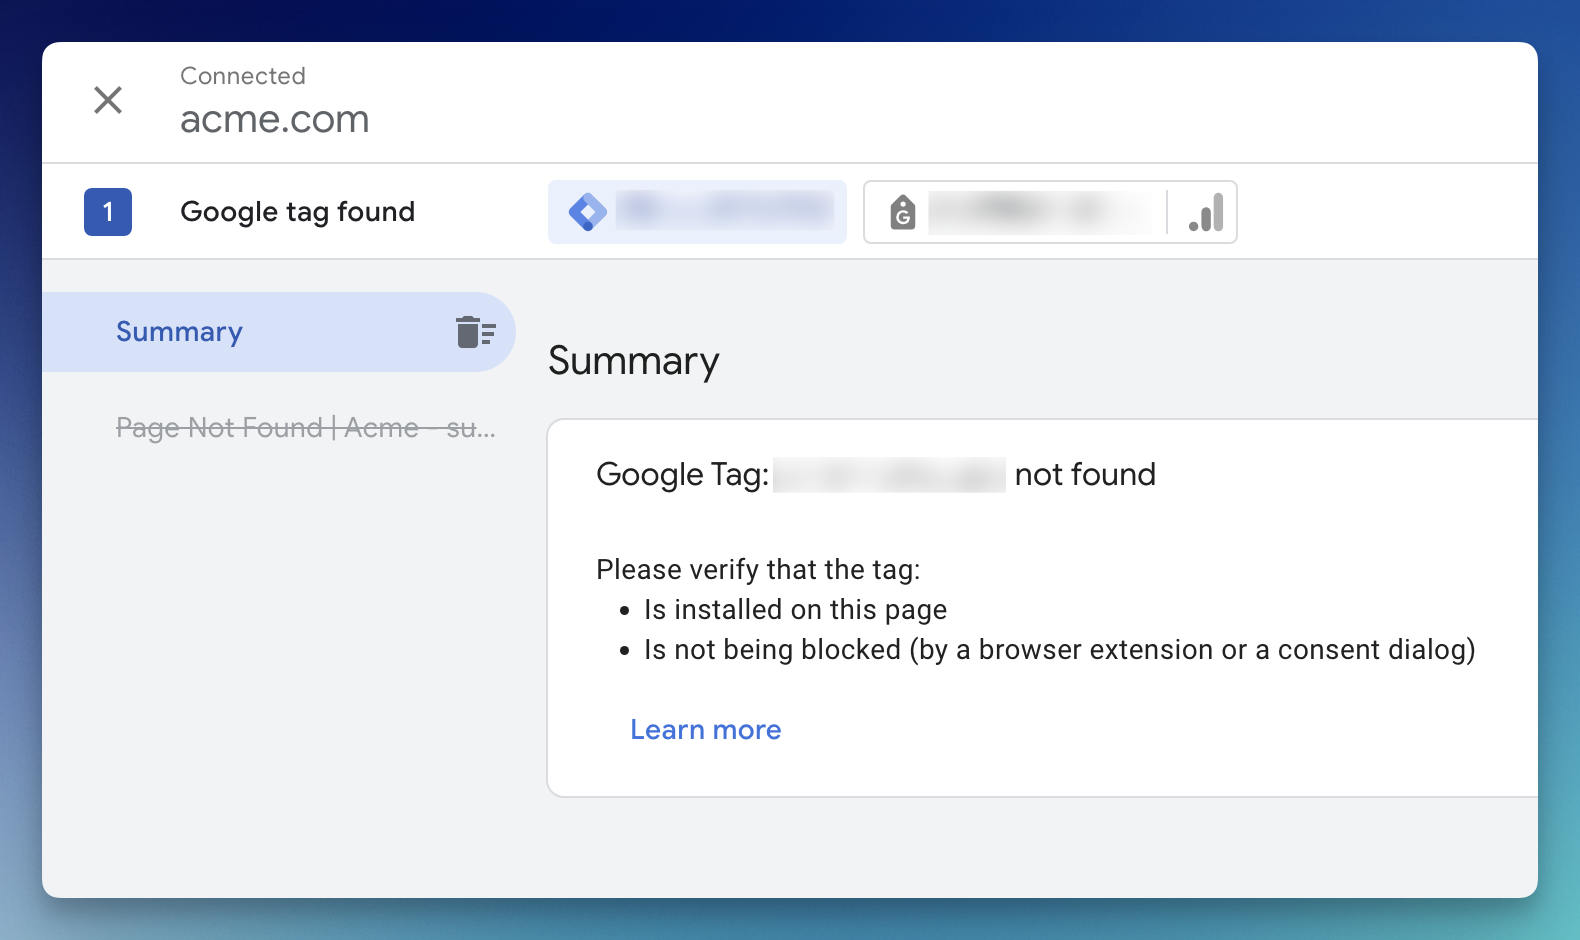
- GTM Not Found: You may see something like “Google Tag: GTM-ABCD1234 not found”. In this case, Tag Manager is probably not implemented properly on your site or it’s not installed on your 404 page. You will likely need to have a developer ensure that GTM is implemented on your 404 page.
Step 3. Check that your Event is NOT Being Pushed when it Should NOT Be
Just to doublecheck that things are operating properly, go back to the GTM preview window. Navigate to a link that should NOT be a 404 error, such as your home page or a product page. If things are working properly you should NOT see a 404 event on this page.
Return to the Tag Assistant window and ensure that you no longer see events for your event name. If you do see them, you may need a developer to ensure that the event push code is only sending the event when a 404 page is encountered.
Step 4. Setup a GTM Trigger to Send the Event to GA4
At this point you have started sending the event “404 not found” (or some variant of that) to the data layer in GTM. We have verified in step 2 that it pushes when it should and in step 3 that it doesn’t push when it shouldn’t. We now need to setup a trigger to send the Tag that we will setup in the next step from GTM to GA4 when an event happens in the data layer with the name “404 not found”.
Return to Tag Manager for the appropriate container and go to Triggers > New. Give the trigger a name, such as “404 Not Found” and then click on the Trigger Configuration box. A list should display, under “Other” you should select “Custom Event” and create a trigger with the following configuration:
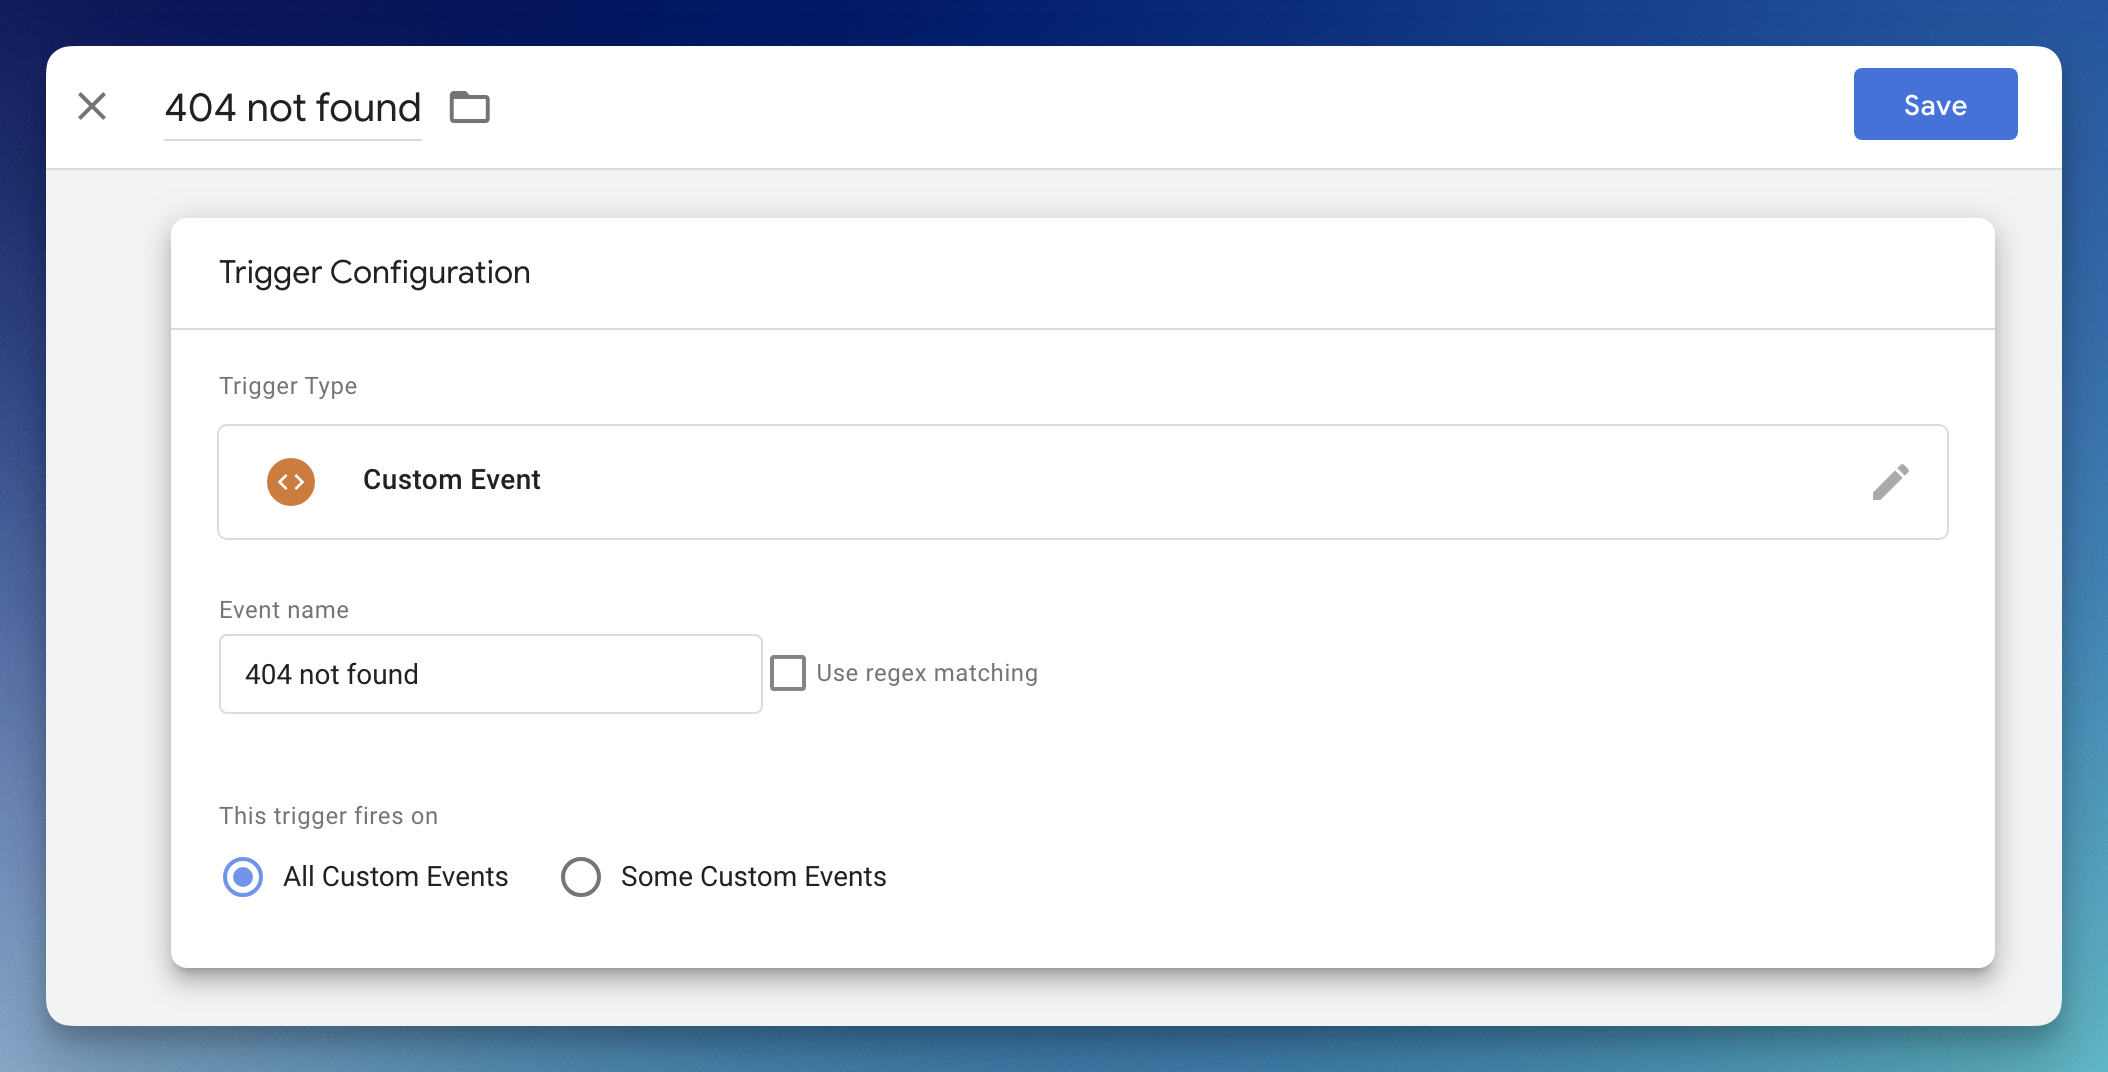
It’s important that you enter the Event name exactly as you have it defined in step 1. Save the trigger.
Step 5. Create a Tag in GTM for the GA4 Event
We now need to create a Tag in GTM to send the event to GA4. It will use the Trigger that we created in step 4. Go to Tag Manager for the appropriate container and select Tags > New.
Select the Tag Configuration box and then Google Analytics > Google Analytics: GA4 Event.
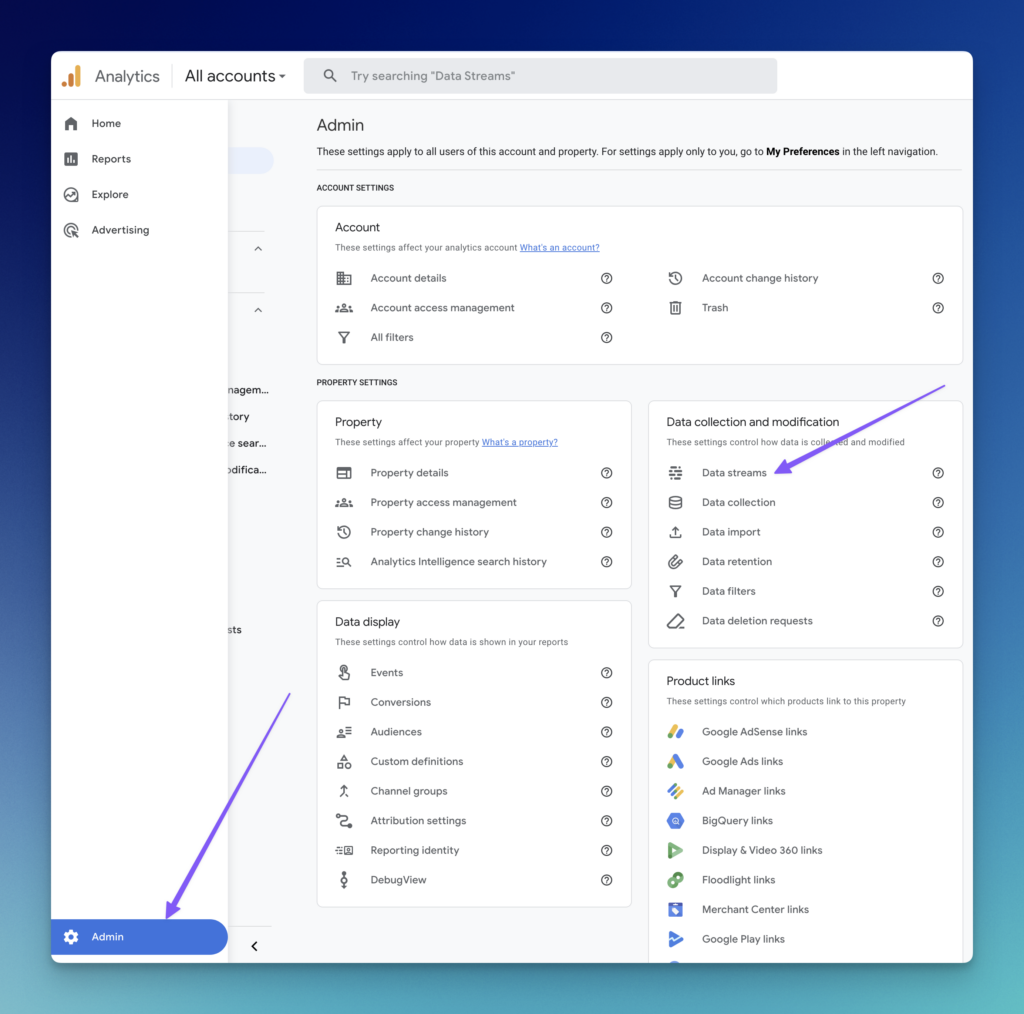
Give the tag a name, such as “404_not_found”. You will now enter the Measurement ID and Event Name. To find the value to enter for the Measurement ID, open up GA4 and select the appropriate Account and Property. Go to Admin (Gear Icon) > Data Streams.
Select the appropriate data stream. Then select the copy to clipboard button next to the Measurement ID. It will start with “G-“.
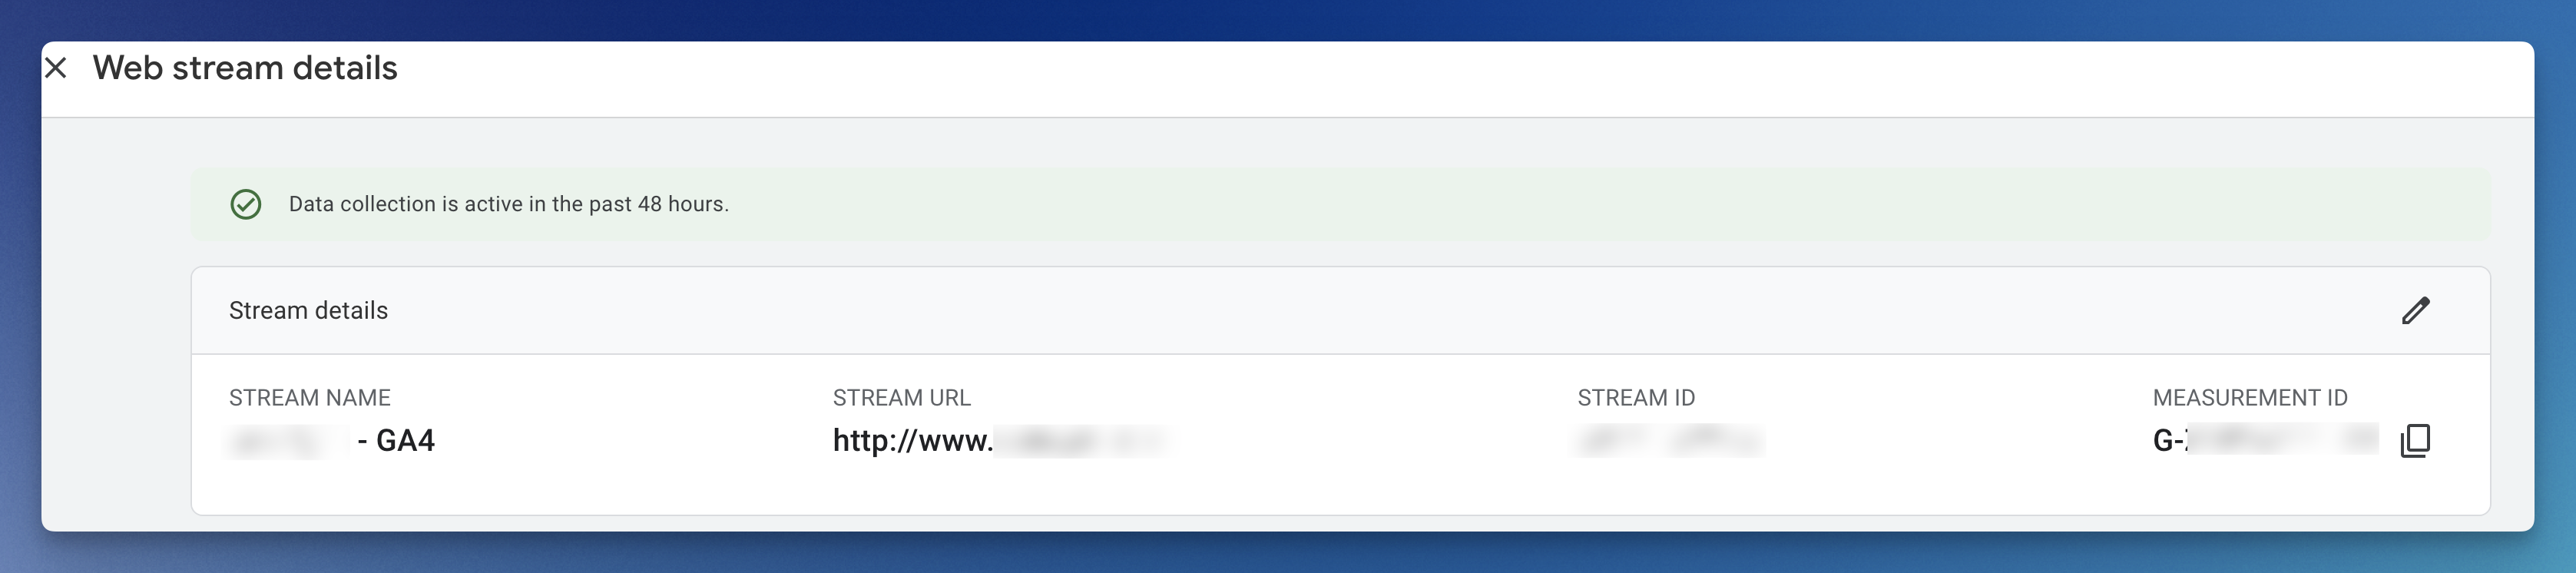
Return to Tag Manager and enter that value into the Measurement ID field. If done properly, next to the field the screen will say Google tag found in this container.
We now need to enter the Event Name to use in GA4. Google suggests using lower case event names that use an underscore instead of spaces. Enter something like “404_not_found”.
You should not need to edit event parameters, user properties, more settings, or advanced settings.
Now select the Triggering box. You should see the trigger that you created in step 4. Select it.
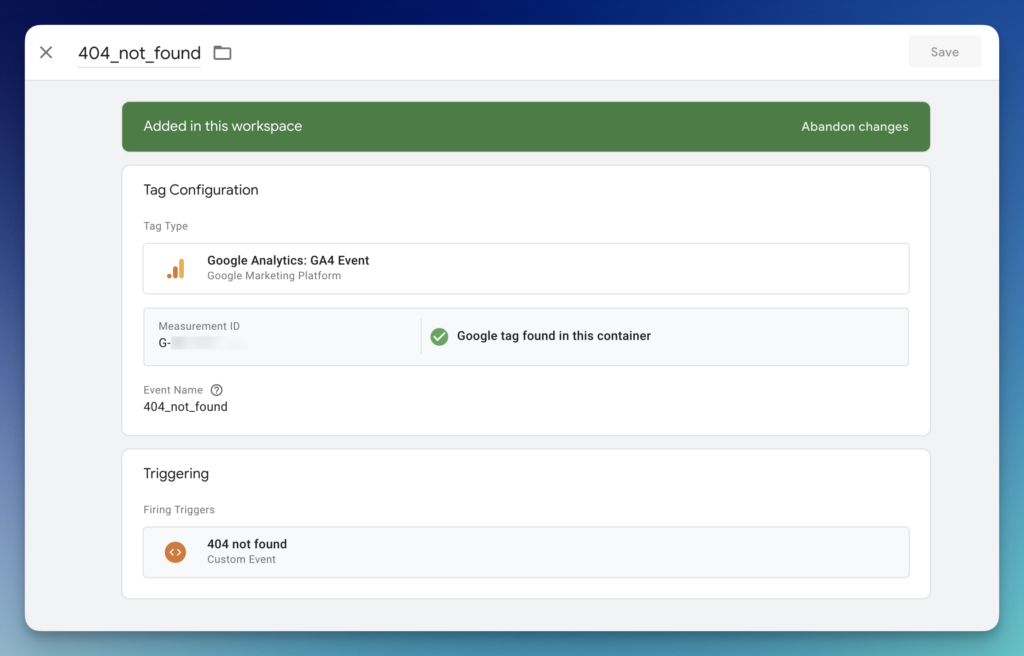
Save the new tag you have created.
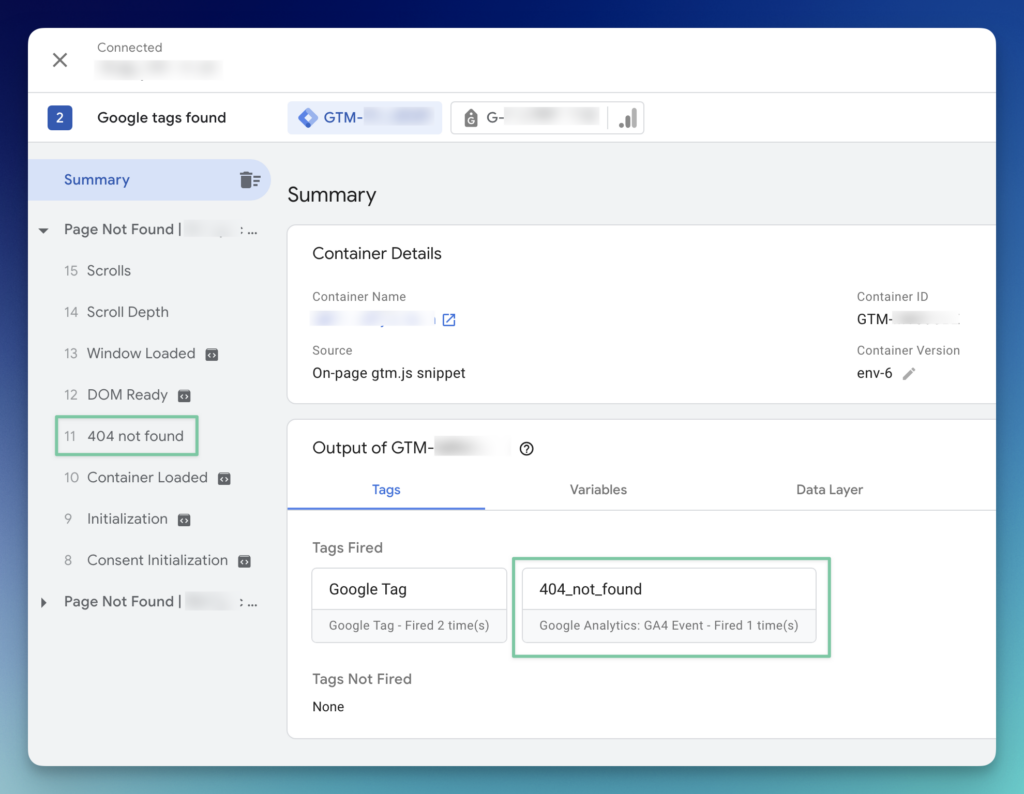
Step 6. Test the Flow from End to End Using GTM
As we did in Step 2, we are going to use Tag Manager Preview to test the flow of the custom event to see if we find 404 errors in GA4. To do this, open Tag Manager and select the appropriate container. You will now select “Preview” where you should enter the URL that you know will create a 404 error. Something like https://[your_domain]/gibberish.
Go to the Tag Assistant window and in the Summary section locate the “404 not found” event. It should be present as we have already tested for it. However now in Tags you should also see that the tag that you setup has fired. If both are present, you are good to move onto the next step.
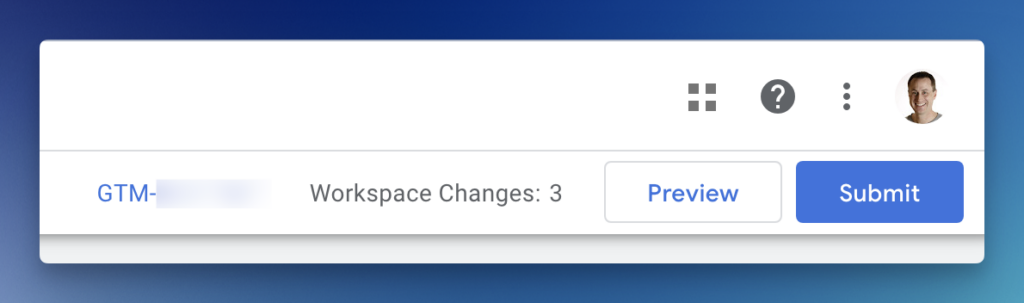
Step 7. Publish the Changes to GTM
If you’ve made it this far, your data should be ready to send so that you can find 404 errors in GA4. You now need to return to Google Tag Manager for the appropriate workspace and click the blue “Submit” button on the version changes that you have made. This can be found on the top right portion of the screen.
Congratulations, you should now be able to find 404 errors in GA4!
Step 8. Viewing the 404 Event Data in GA4
It is important to note that it will likely take up to 48 hours for your event data to populate some of the reports in GA4. The Realtime reports should show the 404_not_found events as they happen. However, looking at summary data will take some time before the data will begin showing up.
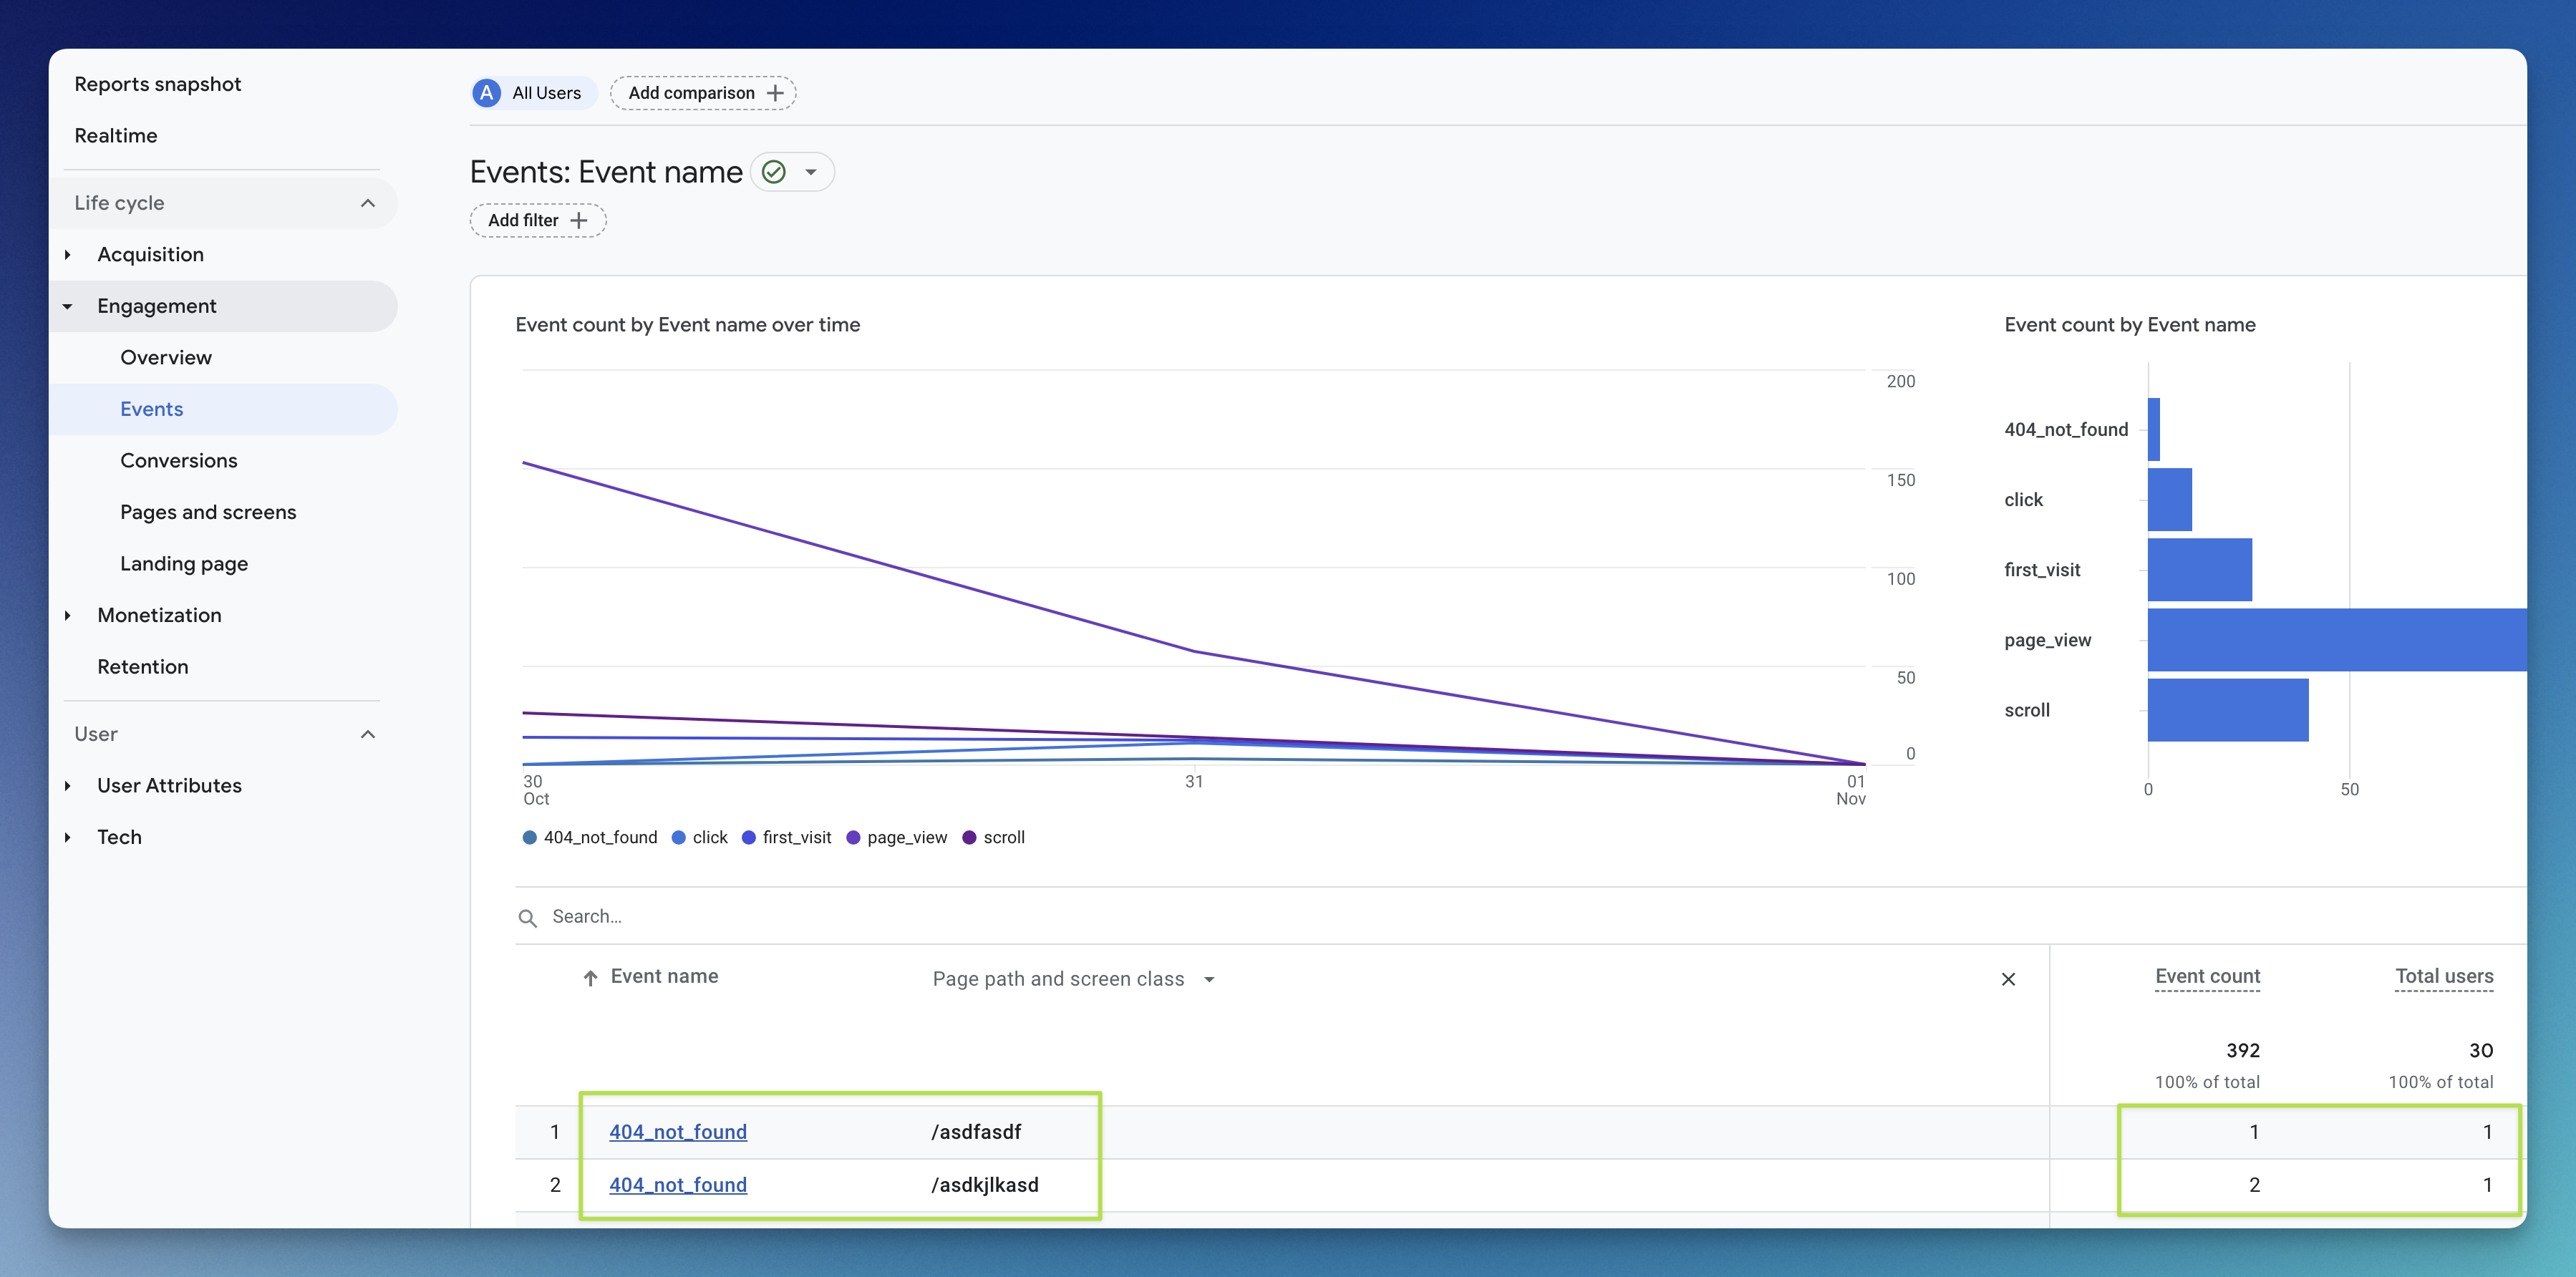
To view your 404 events in summary, you can open GA4 and go to Reports > Engagement > Events. Again, assuming you have waited approximately 48 hours, you should see 404_not_found as an event with the count of events and total users. If you want to see that data by page path that is encountering a 404 error, click the + button to the right of Event name.
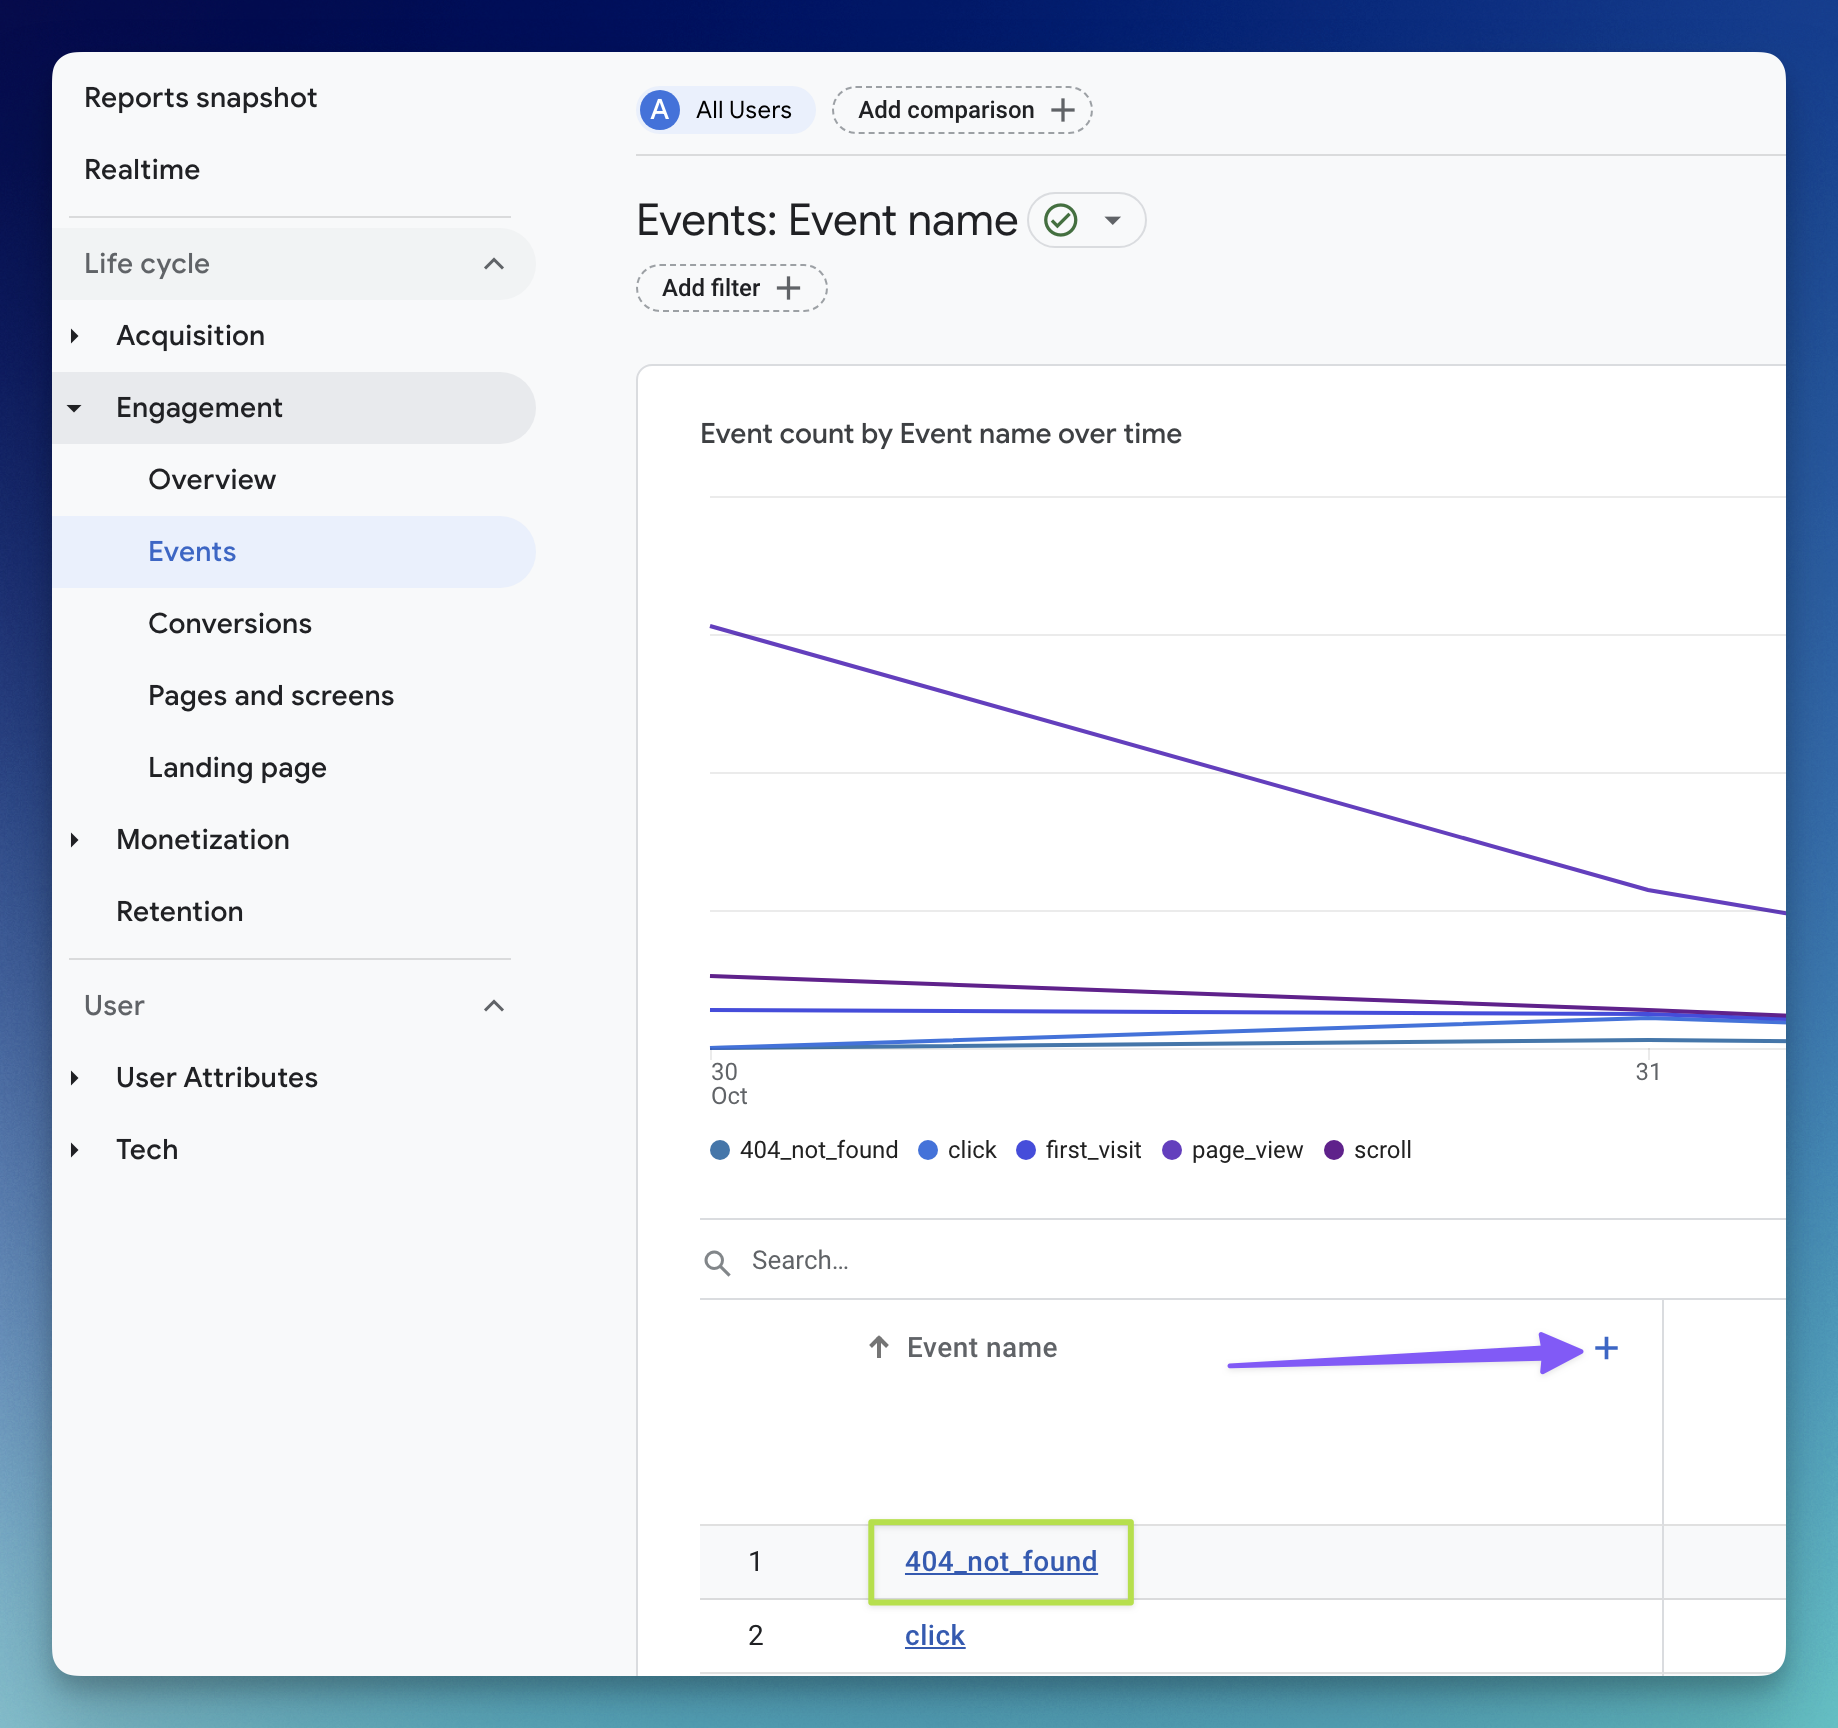
A modal should pop up. In the search box search for Page path and screen class. Find and select that. You should now see the 404_not_found event by page path. And that is how you find 404 errors in GA4 by using a custom event.
Final Thoughts
There is a third methodology of getting 404 error data into GA4 that doesn’t involve GTM. It’s a direct integration sending data from your website directly to GA4. You can learn more about it here.
Navigating the complexities of Google Analytics 4 (GA4) can be daunting, especially when it comes to identifying and addressing 404 errors. While GA4 offers advanced insights into user behavior, it also poses challenges, particularly in the realm of 404 error detection. Google Analytics simply does not offer out of the box 404 reporting.
This article has provided a comprehensive guide on how to detect both hard and soft 404 errors in GA4. By understanding the nature of these errors, determining your website’s behavior upon encountering them, and utilizing either the Page Title method or the Custom Events method, you can efficiently find, track and monitor 404 errors. As with any technical endeavor, periodic reviews and adjustments are recommended to ensure accuracy and efficacy. Armed with this knowledge, you’re better equipped to harness the full potential of GA4 and maintain a user-friendly, error-free website.
Turnkey 404 Error Reporting
As you can now appreciate, the process of finding 404 errors that users are encountering on your website via GA4 can be a daunting undertaking. Check out NotFoundBot for free turnkey 404 error reporting on your website.